[ Note: As of 8/27, SE has posted a complete list of text commands under their beta site. However due to the inaccurate guide they posted at the start of closed beta, I will not be updating this guide until open beta begins, when I have tested these new commands myself. ]
Since my small guide on how to set up macros for changing classes and skills has been expanded a little, I wanted to expand on it even more and try to make it even clearer to understand, including more macro requests and over all a better layout.
Having said that, this macro guide will help you:
A) Find out how to get started on macros
B) Learn the text commands for different macros
C) Change classes and actions under 10 seconds.
D) Learn various battle macros that will make your work a little less tedious
E) Traits, Gathering & Synthesis macros (Soon to come)
So with all that in mind, lets get started!
Getting Started with Macros[ | ]
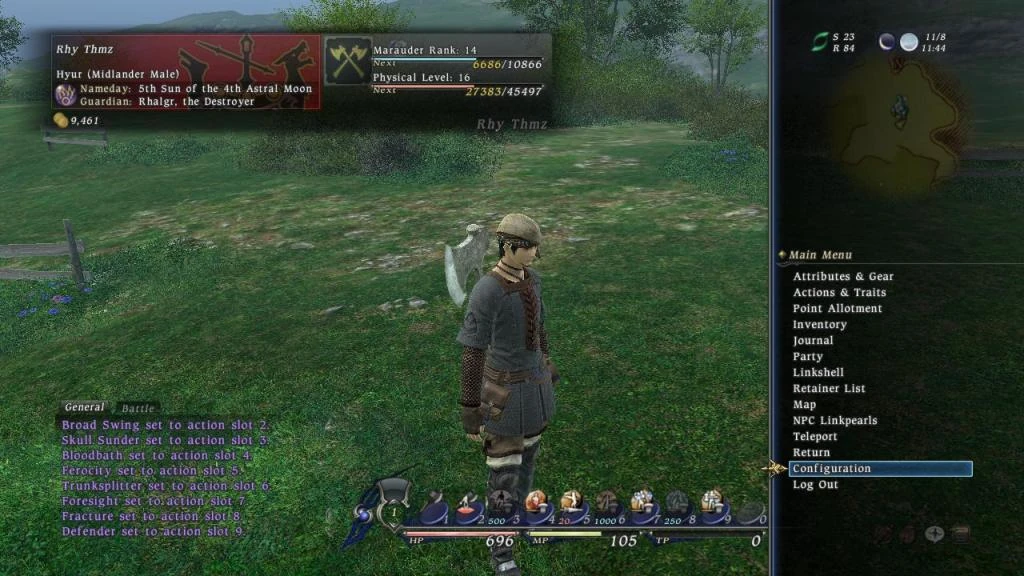
If you don't know how to get to the macro customization page, here is a simple picture guide: Go to menu > Configuration:
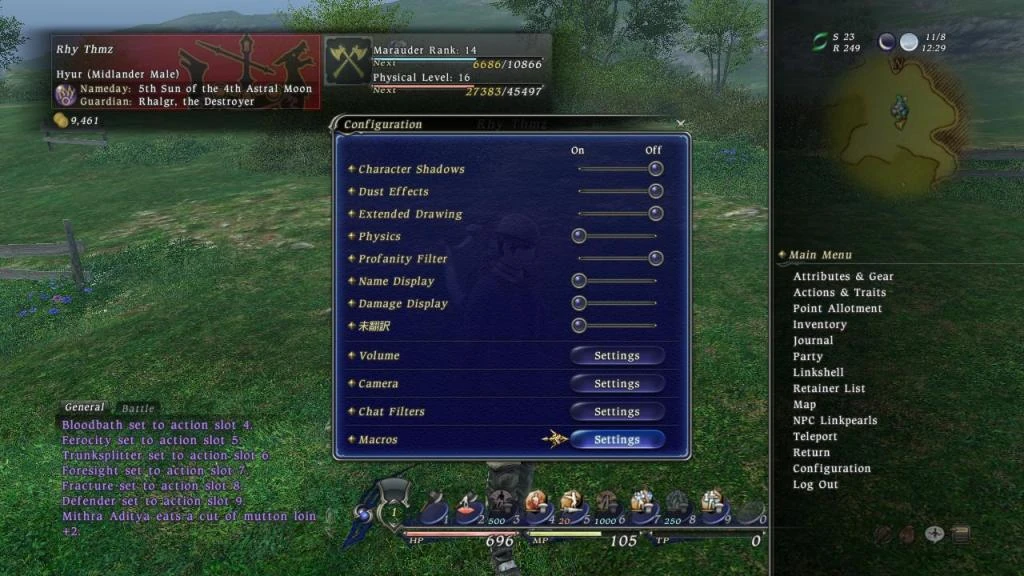
Next, on the config menu, go to the very bottom and select the Settings button next to Macros:
Once at the macro menu, decide whether you'd like to use ctrl or alt. Personally I like using ctrl for class switch macros, and alt for battle macros. Since ctrl is a little harder for most people to reach (at least people like me who don't use the right alt or ctrl keys), the ctrl macros seem more ideal for slow paced situations such as changing your class in a casual setting. I prefer alt macros for battle situations since all you need to do is place your thumb on the alt key and hit the corresponding number for your macro, allowing for quick decision and execution. But use whatever is most comfortable to you and your play style.
Various Text Commands[ | ]
In this section, I'll display all the text commands (and add more as they are added to the game)
Equipping Gear Commands:
- /equip is the standard command for equipping or unequipping gear.
- Gear Slots:
- Main Hand(main)
- Off Hand (sub)
- Throwing Weapon (throwing)
- Pack (pack)
- Pouch (pouch)
- Head (head)
- Body (body)
- Body (clothing) (shirt)
- Legs (legs)
- Legs (clothing) (garment)
- Hands (hands)
- Feet (feet)
- Waist (waist)
- Neck (neck)
- Right Ear (R.ear)
- Left Ear (L.ear)
- Right Wrist (R.wrist)
- Left Wrist (L.wrist)
- Right Index Finger (R.index)
- Left Index Finger (L.index)
- Right Ring Finger (R.ring)
- Left Ring Finger (L.ring)
Examples:
- /equip main _______
- /equip sub _______
- /equip L.wrist ______
Equipping Actions
/equip action or /eaction are the standard commands used for equipping all actions, including weaponskills, spells and self-abilities (even the DoL actions such as Wrist Flick).
Sub-commands:
Main Hand (main): Equips an action that is used from your main weapon. E.G. Trunksplitter, Ferocity, or Cure
Off Hand (sub): Equips an action that is used from your sub weapon. E.G. Shield Bash
Nothing (blank space): Equips an action that is used from your main weapon.
Examples:
/equip action ________
/eaction main ________
/eaction ________ sub
Performing Actions
/action or /ac are the standard commands for performing all actions including weaponskills, spells and self-abilities.
Sub-commands:
Main Hand (main): Performs an action that is used from your main weapon. E.G. Trunksplitter, Ferocity, or Cure
Off Hand (sub): Performs an action that is used from your sub weapon. E.G. Shield Bash
Nothing (blank space): Performs an action that is used from your main weapon.
Examples:
- /action ______
- /ac main ______
- /action sub _______
Targeting Commands:
<t> Performs and action on your current target.
<me> Performs an action on yourself.
<st> Allows you to switch to a sub-target before executing the action. You will keep your original target once the action is executed.
Changing Classes and Actions[ | ]
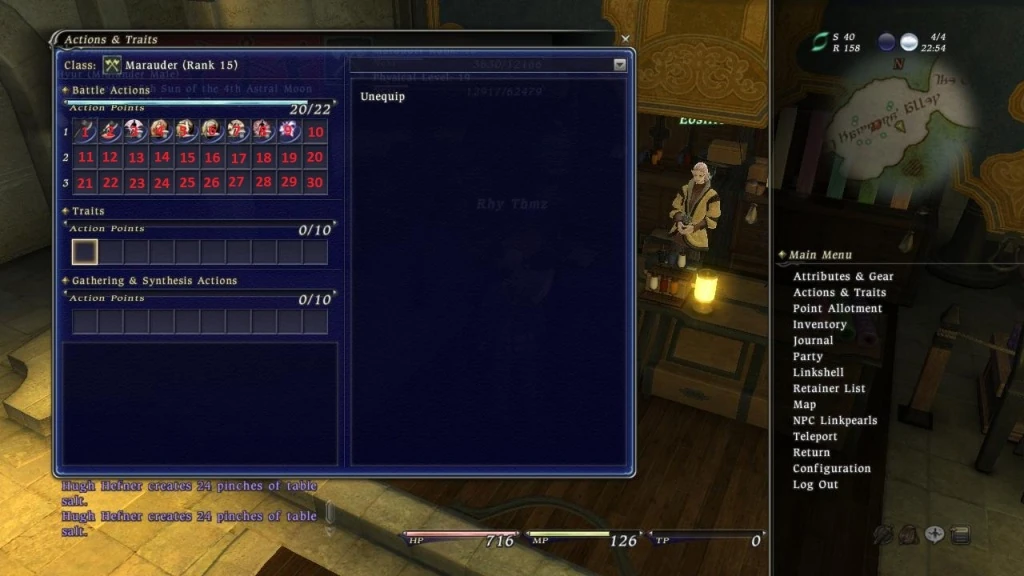
Before we get started writing macro commands, here are the available skill slots and their corresponding numbers for anyone who may get confused on where to place their actions:
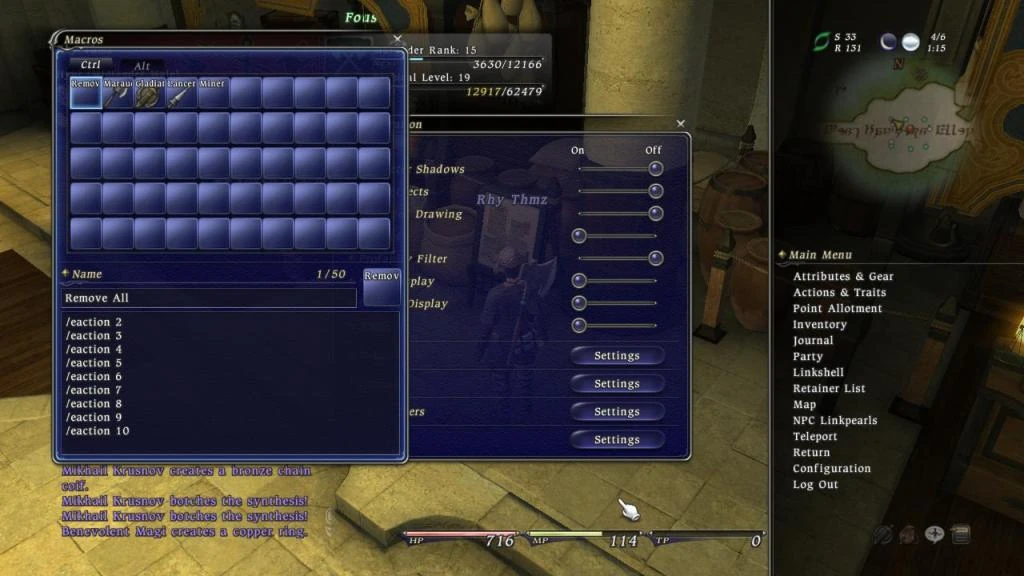
Un-equipping Abilities Once you've selected either ctrl or alt for your class change macros, you'll first want to set up a macro that will unequip all of your abilities. Select the first macro and name it "Remove all" or something relevant. Set the macro up like this:
- /eaction 2
- /eaction 3
- /eaction 4
- /eaction 5
- /eaction 6
- /eaction 7
- /eaction 8
- /eaction 9
- /eaction 10
Setting your macro up like this (leaving the line blank after the slot number) will unequip any action placed on said number slot. Some may ask "Why start with the second slot and not the first?" The answer is because you cannot change the first action slot on the first action bar. It is automatically reserved for your chosen class's default attack skill. Also keep in mind that while there may appear to be an unlimited amount of space available for macros, only the first 10 lines will be executed while using a macro.
As you level up further and gain more skills, you'll eventually need to make 3 of these to unequip any and all skills from your first, second and third lines of macros as well. They will keep the same format, with the exception of changing the numbers from "2-10" to "11-20" and "21-30". Keep in mind you can change the first skill on the second and third lines, as those slots are not reserved.
Changing Classes by Changing Weapons
So after you've made a macro that will remove all your current actions, you will want to make a macro that both a) changes your class and b) automatically sets up your skill bar for the new class. Although it is important to keep two things in mind. First, when adding in your weapon or any other gear piece, the macro lines are case sensitive, meaning you need to pay attention to all spaces and caps used for your weapon. Second, when equipping gear with more than one word, you need to use quotation marks. One-word items do not require them, however.
Select the next macro slot you will be using and name it whatever class you want it to change to and select an icon for it if you'd like. If you are planning on playing multiple classes, your macro set up will be like this:
Referring back to the text commands, here is how to change your weapon through a macro (Say you wish to change to marauder):
- /equip main "Weathered War Axe"
This will be the first line to your class-changing macro. As such, it will automatically unequip your current weapon, equip said weapon in the macro, and change your first action.
Equipping Skills[ | ]
After you have designated which class your macro will change to, it is time to start setting up your action bar. At this point, it is a good idea to write down which skills you will be including for each class either on a piece of paper, or alt-tab into Notepad and type them there. Don't forget macros are case-sensitive.
After you have decided which skills to use and what slots you want to set them to, start writing the rest of your macro like this:
- /eaction 2 "Broad Swing"
- /eaction 3 "Skull Sunder"
- /eaction 4 Bloodbath
- /eaction 5 Ferocity
- /eaction 6 "Still Precision"
- /eaction 7 Trunksplitter
- /eaction 8 Brandish
- /eaction 9 Defender
- /eaction 10 Cure
This is pretty much how I have my marauder set up atm. It's set up so I can easily choose between a single or AoE standard attack, then when I have 500 tp, use skull sunder to place a DoT effect on the mob. And when I hit 1000 tp, I buff up with bloodbath, ferocity and still precision to use either trunksplitter or brandish for a strong hitting attack that will also heal a ton of HP (you will see a macro for that later). Defender's effect can be applied at all times due to a long duration and short cooldown, and cure can be set as an easy to use self-heal macro in the middle of a battle.
When you're done writing everything, your macro should look like this:
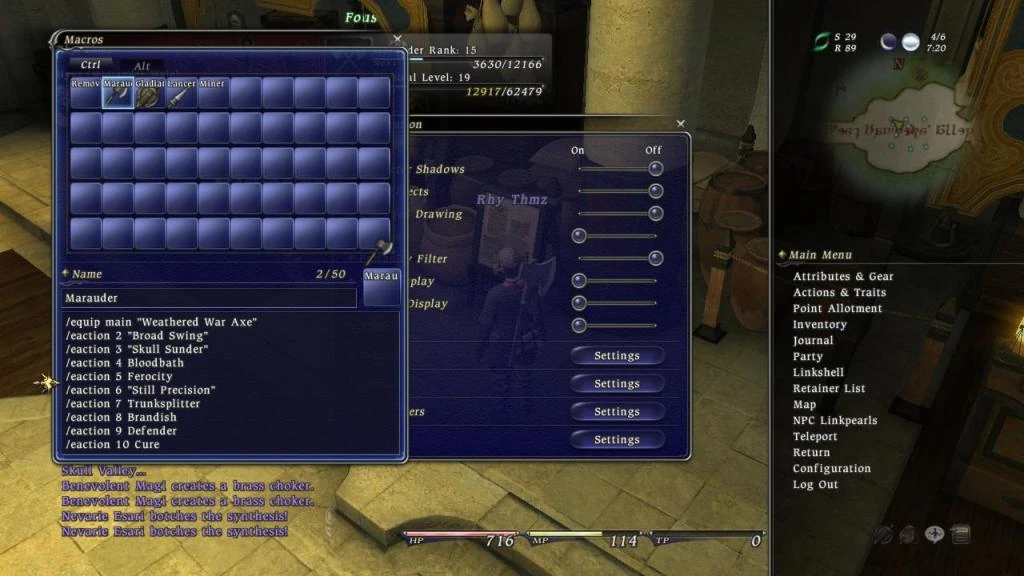
And there you have it, a macro that will change your class and set up your skills. When you get to the point that you need to start setting actions to the second and third action bars, just make additional macros titled "marauder2" and "marauder 3" depending how many bars you're filling.
Battle Command Macros[ | ]
Now that you know how to change classes without going through the laggy UI, it's time to start making some battle macros. It is important to know that all weaponskills, spells and abilities are "actions". Hence, there are no commands such as /weaponskill, or /spell or what not. The only command you need to remember is /action, or /ac for short. Also there is no /wait needed for XIV's macros.
Weaponskill Macros
We'll start with weaponskills first. Simple enough, it's:
- /ac "skill name" <t>
So a marauder wanting to to perform trunksplitter would write:
/ac Trunksplitter <t> : Performs Trunksplitter on your current Target.
/ac Trunksplitter <st> : Allows you to select a sub-target before executing trunksplitter. Keeps your original target after you use your weaponskill.
Spell Macros
There are two ways you can go with spells. Damage/enfeebling spells, and cure/buff spells. Obviously the damage and enfeebling spells with use <t> as a target modifier, where as cure/buff spells can go with either <t> or <me>. However, you could just use <st> for all situations. Like the weapon skill macro, you will use the same format, except you'll use a spell name instead of a weaponskill name. E.G:
Damage Spell Macros
/ac Blizzard <t> : Casts blizzard on your current target
/ac Blizzard <st> : Allows you to pick a sub-target to execute blizzard on. Your original target is kept after you cast your spell.
Cure/buff Spell Macros
/ac Protect <t> : Casts Protect on your current target.
/ac Cure <me> : Casts Cure on yourself without having to target yourself. Great for self-healing solo situations. Keeps your original target after you cast.
/ac Cure <st> : Allows you to select a sub-target to execute Cure on. While great for healing other party members mid-battle, hopefully they will add a <p1-6> targeting system. Keeps your original target after you cast.
Ability Macros
Since abilities can only be used on yourself, there is only one type of ability macro to remember. Any abilities such as bloodbath, ferocity and blindside will use this format.
Self-Ability Macros
/ac "Speed Surge" <me> : Activates Speed Surge.
Ability + Weaponskill/Spell Macros
Now to mix things up a little. The main idea behind macros is to perform many actions at once to make our lives easier. So we will do exactly that by including both ability and weaponskill/spell macros in one.
Melee Weaponskill Macro
- /ac Bloodbath <me>
- /ac Ferocity <me>
- /ac "Still Precision" <me>
- /ac Trunksplitter <t>
As implied, this macro will activate 3 self-buffs, then proceed to execute Trunksplitter on your target.
Magic Spell Macro
- /ac "Trance Chant" <me>
- /ac Profundity <me>
- /ac "Thunder II" <t>
Like the weaponskill macro, this will activate 2 self-buffs, then cast thunder II on your target.
When using these macros, keep in mind that the most effective buffs are the ones that apply towards your next spell or attack. Buffs that have a long duration, I find don't require a macro and usually just activate them on the action bar.
Traits, Gathering & Synthesis Macros[ | ]
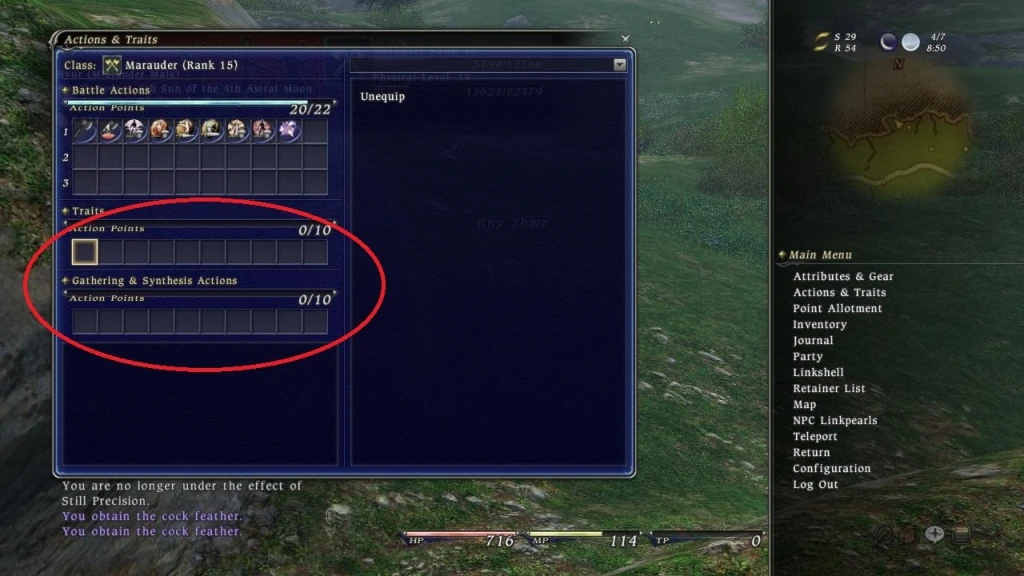
[ Need some clarification on this, will do some trial and error come open beta. ]
So there you have it. Hopefully this guide will help any and all newcomers who are having macro trouble. If you still have questions or concerns, I will do my best to answer them promptly.